PlaneMaker Basics
NOTE
This tutorial was performed with PlaneMaker version 12.4.2
Introduction
PlaneMaker is used to produce an Aircraft File (ACF). This is a file with a *.acf file extension. It is a plain text, human readable file that contains all the information X-Plane needs to simulate the aircraft. X-Plane reads the ACF file whenever you load the aircraft in X-Plane. There can be additional, optional files utilized in simulating an aircraft such as 3D model files, sound files, livery images etc. For this tutorial, we will create the ACF file and utilize some additional 3D files and textures for some eye candy.
It is important to understand how PlaneMaker is organized, so you can find your way around it quickly. It is also important to understand the various ways you can enter numbers in the many fields available. You will be entering LOTS of numbers so it is worth your while to take some time to get familiar and comfortable with the techniques. In this section, we go over such PlaneMaker basics, so lets launch PlaneMaker and explore the controls and interface.
Menu Navigation
- Launch PlaneMaker, then select
File>New. You will see a simple cylinder in the 3D view.
Navigation of PlaneMaker Data Entry Windows are via five GUI elements: Menus > Pages > Tabs > Panels > Data Field. Its the Data Fields we want to find and enter data into, so knowing the path to those data fields is paramount. Note that not every page have tabs or multiple panels, but most do. The location of any particular Data Field is specified by calling out a path sequence to it. For example, to locate Data fields regarding Inverters, we navigate to the Inverters Panel using the following path.
Standard > Systems > Electrical 1 Tab > Inverters Panel
The video further below illustrates this path sequence. In the steps that will follow, we regularly call out the navigation paths to the various data fields you will be entering data into.
3D View Navigation
Close any open windows so you can see the 3D aircraft and practice using the keys to manipulate the 3D view.
-
Swap between the Wireframe / Rendered view by toggling the
SPACEbar. -
Rotate the View using the
A,S,D,Wkeys. -
Pan the View using the Arrow Keys while holding down the
SHIFTkey. -
Zoom in/out using the (+ / -) keys. Optionally, hold down the
SHIFTkey for faster zooming. -
Re-Center the model using the BACKGROUND menu options (Top / Bottom / Side / Front / Back)
WARNING
There is no way to reset the ZOOM in the 3D view. If you get lost in the 3D view, use the background menu to select a standard view, which re-centers the model, and then zoom to your desired view using the Zoom keys
Moving Around Data Fields
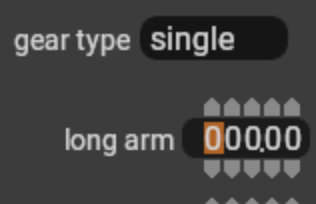
You will spend a lot of time moving around and filling out numerical Data Fields, and there are multiple ways to do it, so you should practice a bit to make it as quick and natural as it can be. We'll practice by navigating data-fields on the Landing Gear Page.
Go to Standard > Landing Gear and click on the left-most (first) digit in the long arm row. The cursor should highlight the digit field as shown at right. There are four ways to move the cursor around. Practice doing each, and watch the highlighted digit fields as you do so. Using the keyboard is a very quick way to move around to enter data.
- Use the
left / rightarrow keys to cycle through all digits in a single data-field. - Use the
TABkey to cycle to an adjacent data field in one direction. - Use the
SHIFT + TABkey to cycle to an adjacent data field in the opposite direction. - Use the mouse to put the cursor where you want it and confirm with the highlighted digit.
Entering Numbers
BE AWARE
You do NOT enter decimals in PlaneMaker, the decimals are in fixed positions in the data fields and they can be very challenging to see. Make sure you are entering digits in the correct positions relative to the fixed decimal. The "Lookout" note below shows how challenging those decimals are to see!
Once you have the cursor where you want it, then there are 3 techniques to enter numbers into the Data fields.
- Using the mouse, click on the 'Arrow' icons keys above and below each digit to increment the digit.
- Use the
Up / Downarrow keys to increment/decrement the highlighted digit. (Best for 'keyboardists') - Highlight the first digit location of a number and type in the entire number. For example, if you need to enter 34.25, just click/highlight the 2nd digit to the left of the decimal and type '3425'. This is generally the fastest way to enter numbers.
TIP
If you wants to zero out a data field, hit the 0 key repeatedly until all digits are zero!
Positive / Negative Numbers
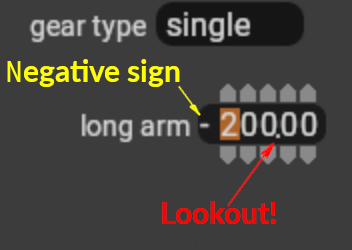
There are three ways to enter negative numbers, the first two are very annoying, the third option is the way to go; however, all work. Be aware of the location of the negative sign as shown at right. It is NOT very conspicuous.
- Use the Down ICONs to decrement digits as required to make the total number negative. (look for the negative sign)
- Use the Down ICON to decrement ANY digit until the overall number is negative, then type in the desired number as described above. The negative sign will "stay" as you type.
- Use the following Key combos to MAKE the number positive or negative.
| keystroke | Effect |
|---|---|
COMMAND - |
Makes the number negative |
SHIFT + |
Mekes the number positive |
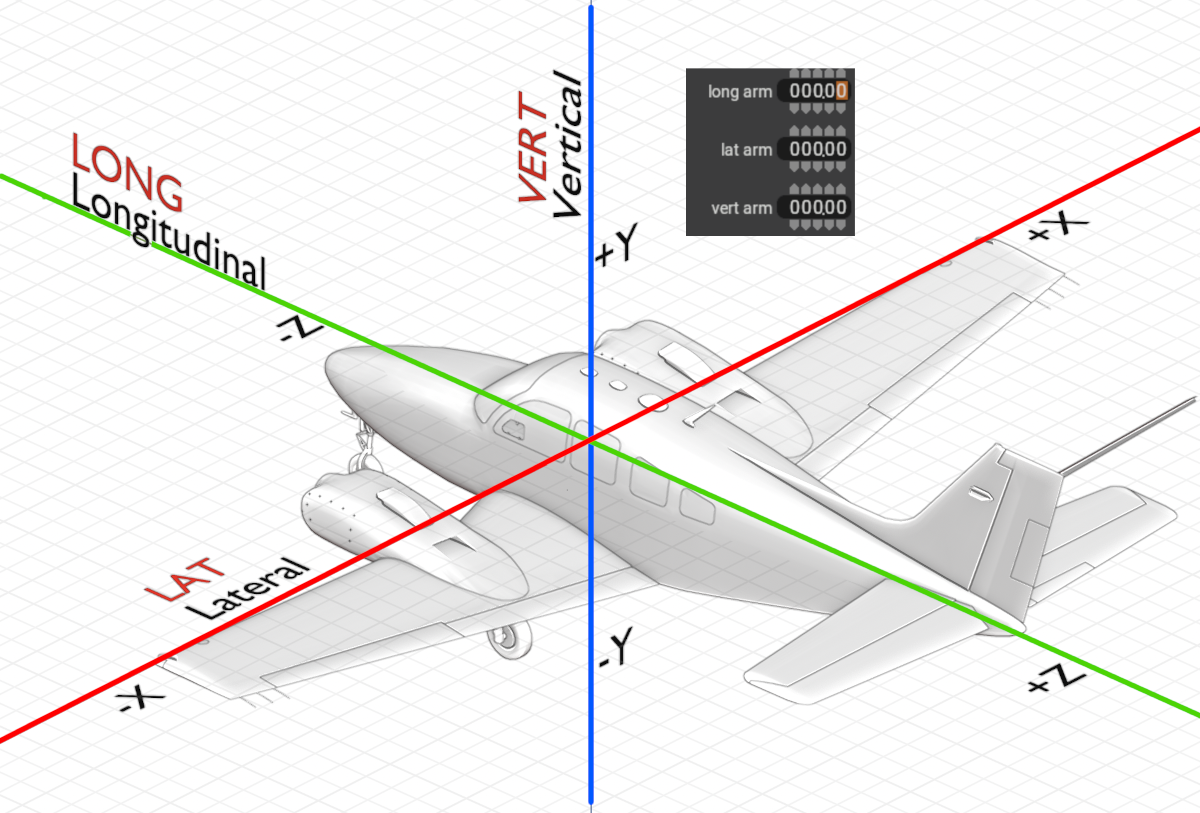
Coords / Datums
It is a frequent and common activity to locate things on the airplane, so an understanding of the ACF coordinate system and Datum is warranted. Make note of the directions and terms associated with each direction, you will see the common terms throughout PlaneMaker as illustrated in the PM clipping below.
| Axis | Common term | Description |
|---|---|---|
| X | Lateral / LAT | Side to Side |
| Y | Vertical / Vert | Up / Down |
| Z | Longitudinal / Long | front to back |
Aircraft Datum
All location coordinates entered in PlaneMaker are with respect to the same Datum, the (0, 0, 0) point. In the illustration above, the Datum/Origin is shown at the aircraft Cg location; however, it is more common and preferred to make the nose of the aircraft the datum/origin. The images further below illustrate these variations.
- Datum is implicit, not explicit in PM. It is in your head.
- Datum is arbitrary, you select its location and enter your coordinates accordingly.
- Negative values are:
- to the left of the datum (X)
- below the datum (Y)
- forward of the datum (Z)
- The images below shown differing datum locations and how the longitudinal values differ in sign on either side of the datum. if you make your datum at the CG location then some fuselage station locations will be negative and others positive and this can be confusing to keep track of and result in visually confusing geometry in the 3D view if you don't pay attention. This is why most X-Plane aircraft authors typically choose a datum in front of the aircraft, or right at the nose.
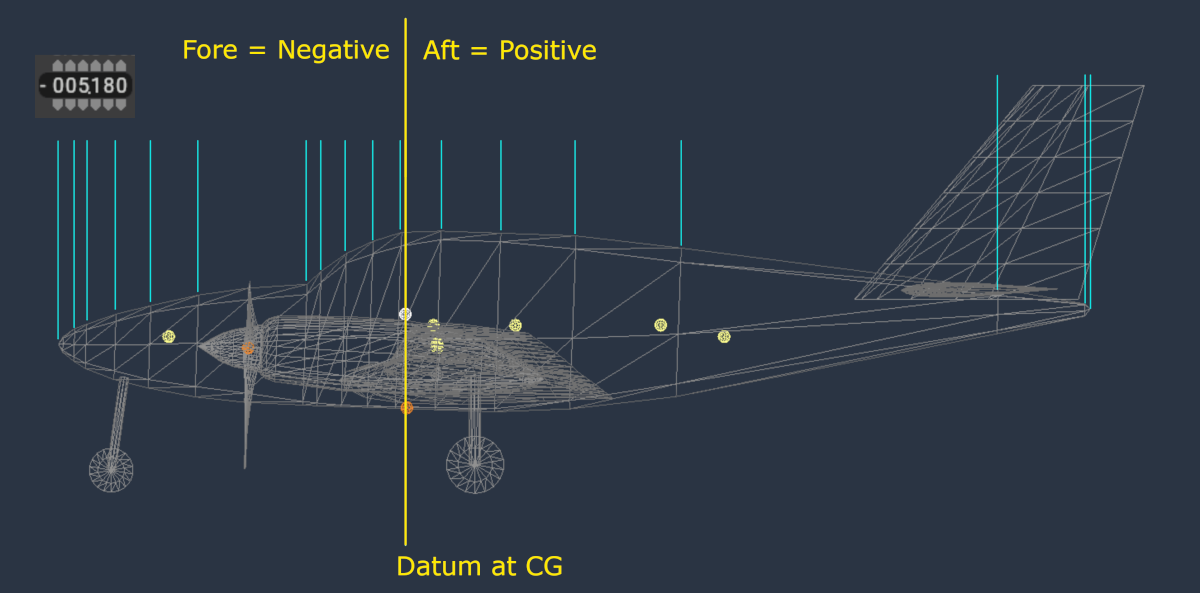
DATUM at CG (Click to Enlarge)
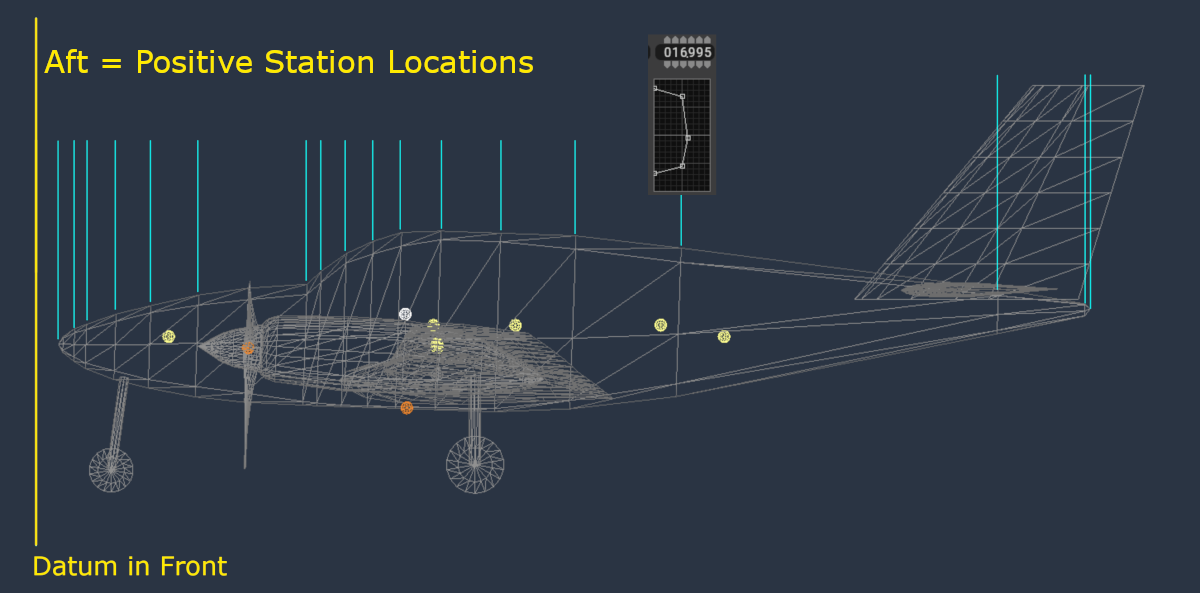
DATUM in front (Click to Enlarge)
Editing Units
You can toggle between Imperial / Metric units via a checkbox found at the following location:
Standard > Viewpoint > General > Cockpit Panel
- Units affect length and mass.
- Speed is always in knots.